

We know that Photoshop is an important computer application tool for managing
complex digital arts, animation and graphic design. When you use this software,
you may make mistakes and want to delete parts of an image during your design.
But, you can easily undo the image modification process with the masking
process.

This Photoshop has different types of masking for different tasks. The most
important of these are Clipping Masking, Layer Mask, Quick Mask etc. These types
of shortcuts are a quick way to run computer programs. Therefore, if you want to
display a dropdown menu in Windows operating system, you right-click with your
mouse. A keyboard shortcut menu will appear in front of you, with which you can
quickly complete the task. Shift + F10 on the computer keyboard will display your
menu and right-click your mouse. So, this method will share different types of
masking in Photoshop with keyboard shortcuts. It will make your work very fast.
Different Masking in Photoshop
There are different types of image masking layers in Photoshop with keyboard
shortcuts on computers. Masking is part of a layer that is a way to make an image
invisible. A layer mask in Photoshop creates an effect that is generally described
as non-destructive. This means that the image you make invisible can be made
visible again.
Photoshop Layer Masking
All artists in Photoshop use masks to hide or show parts of an image, allowing
separate elements to create composite images. An image mask layer consists of a
grayscale bitmap. You can probably draw a mask by hand and just do a selection
process to determine its shape. Additionally, you can turn your image layer’s
visibility on and off to see it with effects by Shift-clicking its icon in the Layers
panel. Which will be easy for you.
Photoshop Vector Mask
Usually pixel-based layer masks are blurred, and can be partially transparent. But
Photoshop vector masks always show hard edges and opaque visible parts. You
can turn the visibility of vector masks on and off in the Layers panel. How do you
turn off an image’s layer mask? If you convert a Photoshop vector mask to a layer
mask, it covers the layer mask properly and is important to create a layer other
than one.
Photoshop Quick Mask
A Photoshop quick mask provides temporary pixel-wise visualization of an image
selection. It’s the important “marching ants” that progress to the animated dotted
lines that appear on the image in the document window. Photoshop Quick Mask
fully displays a small area of detail, while “Marching Ant” displays a full outline of
the selected area. A Photoshop document cannot contain more than one Quick
Mask, so you can save the selection that acts as your alpha channel. Photoshop
can turn quick layer masks.
How Photoshop Image Masking Works
We already know that white color means a visible in mask business. And that
means, of course, that the layer in image-1 below is fully visible. And Image-2 is
(Hello and Goodbye) a layer. For that our foreground color is set to black. Now to
delete our image-2 (Hello and Goodbye) layer, we simply use our paintbrush,
setting the foreground color to black. What we need to do for that is to set our
foreground color to white and just paint over the area we deleted. As well as
returning the layer to its original state.
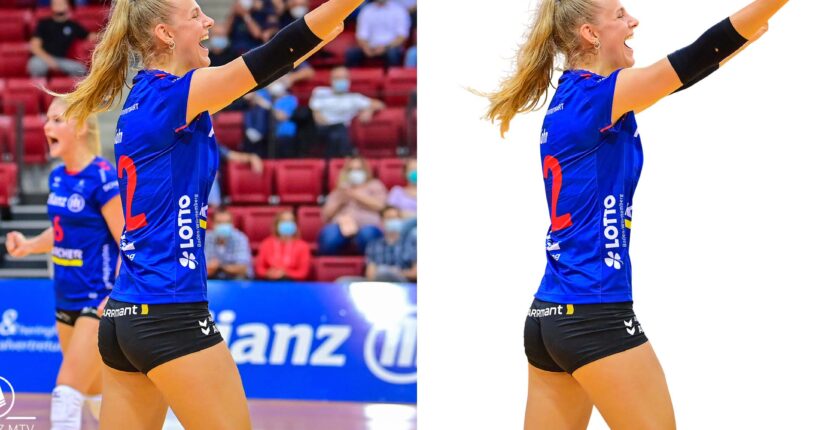
Here’s a word, if the edges of your image are clean and straight, it will be very
easy to remove its background. In that case, in some way, the edges of the image
are blurred, such as irregular flower branches or pet wool, it is difficult to see. At
that point, the masking service for the image is very important.
All in all we can say that photoshop image masking is a great technique to
improve the quality of an image and make it attractive. Using our above
technique, you can enhance the transparency and attractiveness of an image and
adapt the background to any subject to match the image.
Best of all for your work, you can mask images faster with computer keyboard
shortcuts. And you can start masking different types of images with keyboard
shortcuts in Photoshop. As we did Photoshop image masking in above discussion.